
IP Groups
An IP Group defines the stable service addresses that clients use to access SMB, NFS, S3, and iSCSI services. It also determines which gateway nodes may serve those addresses and the order in which they are used during failover.
The cluster monitors the addresses and can move them to another eligible gateway during maintenance or after a failure. Shares, exports, buckets, users, and access keys remain unchanged. Existing client connections may need to reconnect.
Before you begin
- The cluster is configured and all intended gateway nodes are online.
- One or more unused static IP addresses are available on the client-facing network.
- Every eligible gateway can access the required VLAN and subnet with consistent MTU, routing, and firewall configuration.
- The addresses are excluded from DHCP and recorded in IPAM.
- DNS records are prepared if clients use a service name.
- For S3 over HTTPS, a certificate is available that matches the DNS name used by clients.
- For iSCSI multipath, prepare at least two addresses, two eligible gateway nodes, and multipath-capable initiators.
Open IP Group Management
- Sign in to the euroNAS Administration GUI.
- Open Cluster Management.
- Select IP Groups.
- Review the existing groups and their members before making changes.
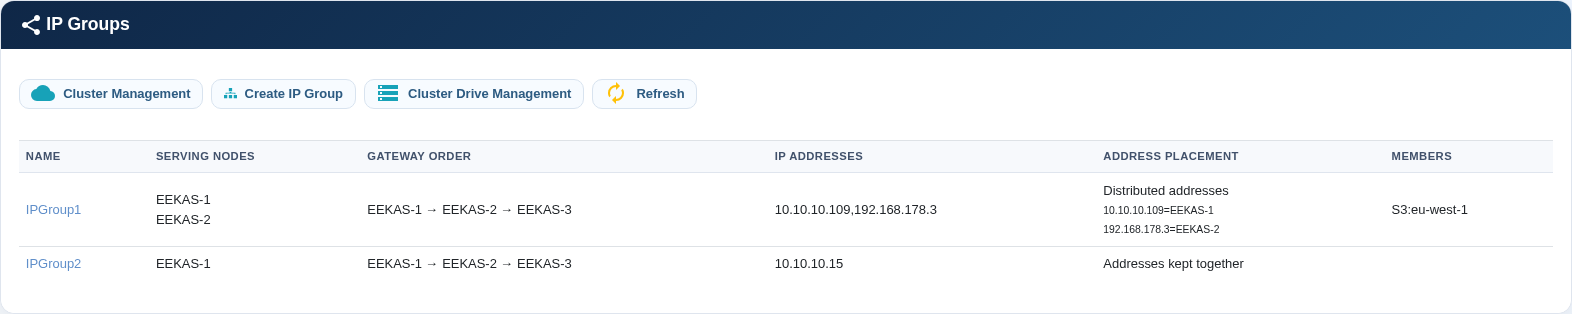
The overview shows the current serving nodes, gateway order, service addresses, address placement, and assigned services.
| Column | Meaning |
|---|---|
| Name | The permanent administrative name of the IP Group. |
| Serving nodes | Nodes currently serving one or more addresses from the group. |
| Gateway order | Primary, secondary, and fallback preference used for placement and failover. |
| IP addresses | Floating client-facing service addresses. |
| Address placement | Shows whether addresses remain together or are distributed across gateway nodes. |
| Members | SMB, NFS, S3, or iSCSI services that currently use the group. |
Create an IP Group
- Select Create IP Group.
- Enter a unique name containing 3–15 letters or numbers. The name cannot be changed after creation.
- Enter the service IP addresses separated by commas and verify that they are not already in use.
- Enable only the nodes that may serve this IP Group. Unselected nodes are excluded.
- Arrange the enabled nodes as primary, secondary, and additional fallback nodes.
- Select the required address-placement mode.
- Review the settings and select Create Group.
- Return to the overview and confirm that the group has a serving node.
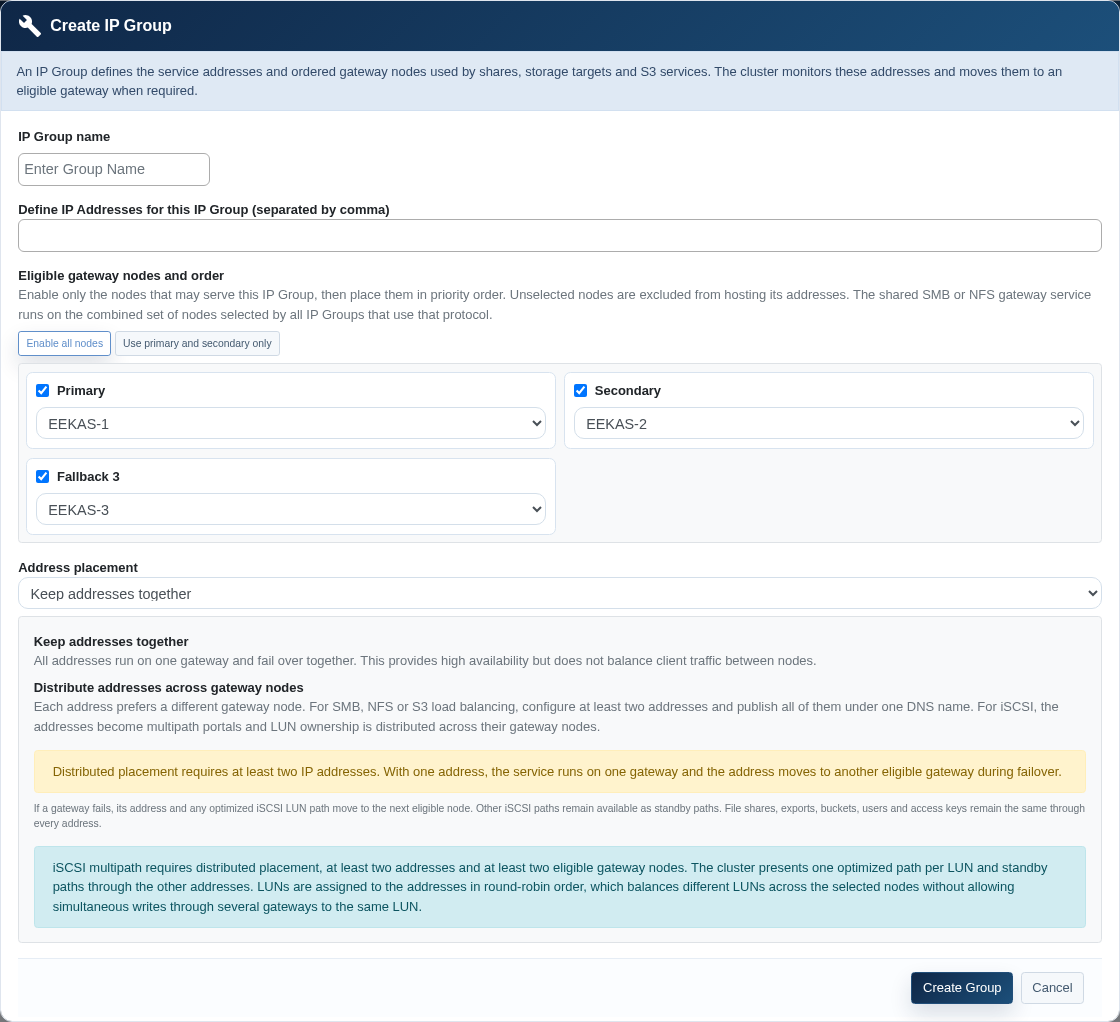
Choose the address-placement mode
| Option | When to use it | Requirements |
|---|---|---|
| Keep addresses together | All addresses run on one gateway and move together during failover. This provides high availability but does not distribute client connections across nodes. | At least one address; two eligible nodes are recommended for failover. |
| Distribute addresses across gateway nodes | Each address prefers a different gateway. Use this for multiple S3 or file-service addresses and for iSCSI multipath portals. | At least two addresses and two eligible nodes. Publish every intended file or S3 address in DNS and configure multipath on iSCSI initiators. |
Note: With one address, the service runs on one gateway. If that gateway fails, the cluster moves the address to the next eligible node.
Edit an existing IP Group
- Select the IP Group name in the overview.
- Review the entries in the Members column before changing addresses or gateways.
- Modify the addresses where permitted for the services in use.
- Enable or exclude gateway nodes and set their new order.
- Select Save Settings.
- Allow the cluster to reconcile placement. Refresh the overview and confirm the serving nodes and address mapping.
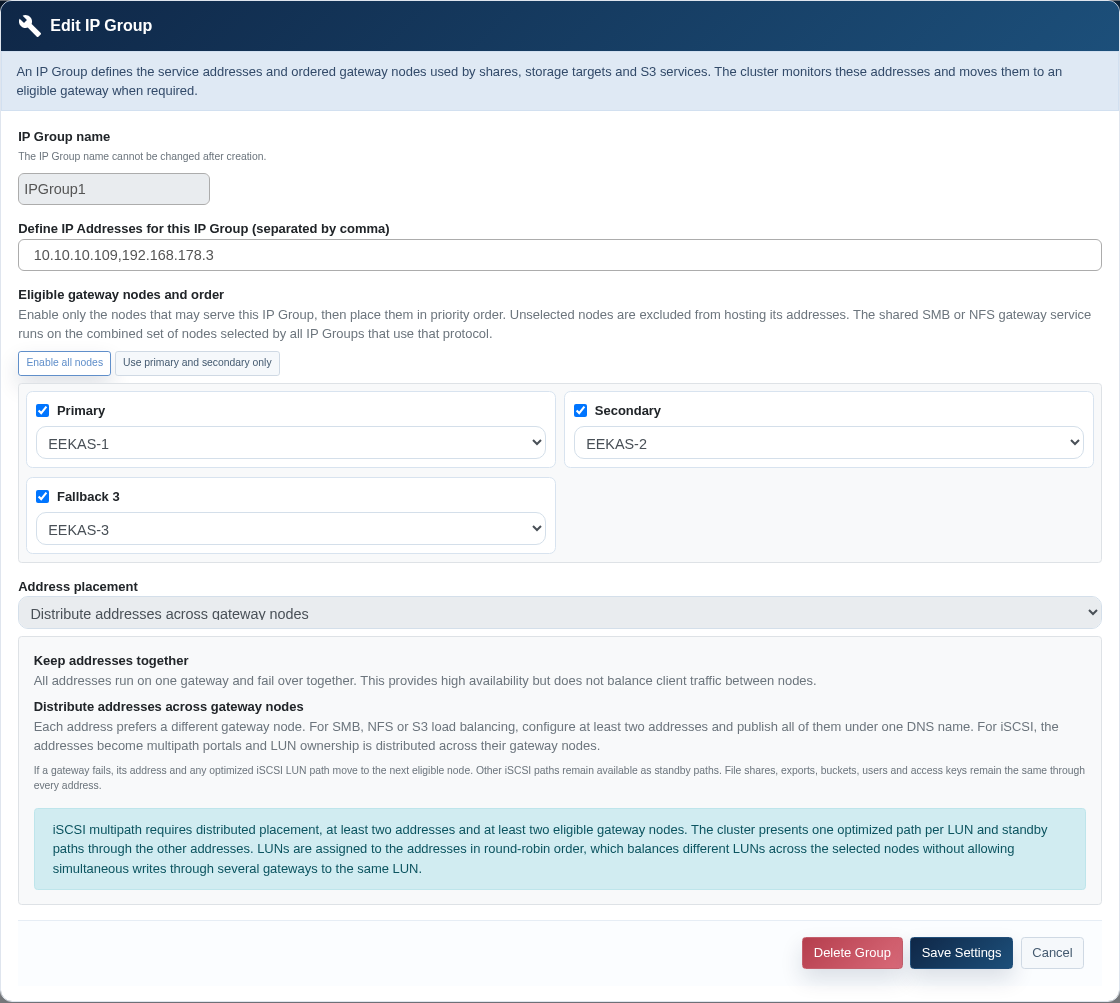
Assign an IP Group to an S3 service
During S3 drive creation
- Create the IP Group before starting the S3 drive wizard.
- Select the intended IP Group in the S3 service section.
- Enter the DNS name used by clients.
- Choose HTTP or provide a matching certificate for HTTPS.
- Complete the wizard and wait until all gateways are ready.
- Verify DNS resolution and the HTTPS certificate from a client network.
Change the IP Group of an existing S3 drive
- Open Cluster Drive Management.
- Open the S3 drive properties and select Show S3 Certificate.
- Select the new IP Group at the top of the dialog.
- Select Change IP Group and confirm.
- Keep the dialog open and monitor the progress bar. The system validates the group, adjusts gateway placement, and updates membership and monitoring.
- Test the endpoint from every required client network.
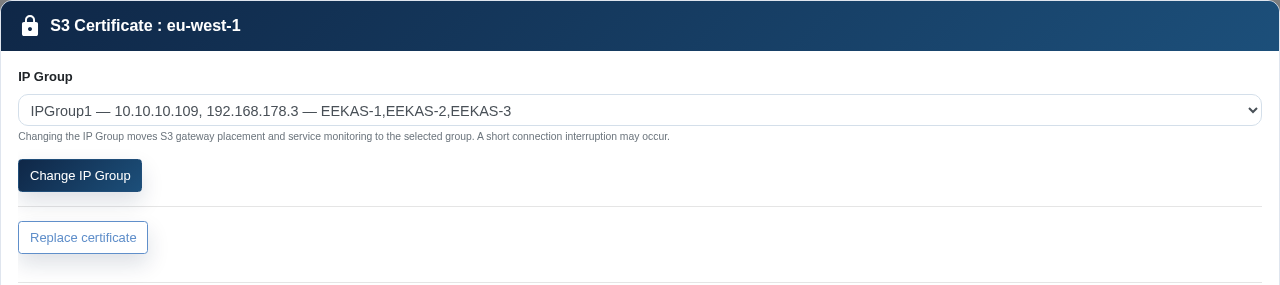
Certificate material is intentionally excluded from this screenshot.
DNS, TLS, and client configuration
DNS
For a group with one address, publish that address under the service name. For distributed S3 or file access, publish all intended addresses under the same DNS name. Choose a DNS TTL that supports your recovery objectives.
TLS for S3
The certificate must match the DNS name used by clients. You can add a certificate later to an S3 drive initially configured for HTTP or replace an existing certificate. Verify the complete certificate chain, expiration date, and matching private key before applying it.
iSCSI initiators
Configure every portal address and enable the operating system's supported multipath driver. One optimized path is assigned per LUN; the other paths remain available as standby paths.
Daily monitoring
- Confirm that every IP Group shows the expected serving nodes.
- Compare the address mapping with the selected placement mode.
- Verify that every expected service appears under Members.
- Review cluster health warnings and gateway diagnostics.
- Test the service endpoint, not only node reachability.
- For S3, monitor certificate expiration and DNS correctness.
Planned maintenance and failover validation
- Confirm that at least one alternate eligible gateway is healthy.
- Record the current serving-node and address mapping.
- Perform the approved maintenance or controlled failover action.
- Refresh IP Group Management and confirm that the address moved to an eligible node.
- Test service access through DNS and every published address.
- After restoring the node, confirm that it rejoins the eligible set. The address may remain on its current node to avoid another unnecessary interruption.
Troubleshooting
| Problem | Checks | Corrective action |
|---|---|---|
| The group has no serving node. | Cluster quorum, eligible-node status, VLAN, network interface, address conflicts, and gateway diagnostics. | Restore an eligible node or network path and remove address conflicts. |
| The address responds but the service does not. | Protocol gateway, port, certificate, service membership, and firewall. | Review cluster diagnostics and correct the protocol or firewall configuration. |
| Distributed addresses remain on one node. | Placement mode, number of addresses, number of enabled nodes, and current constraints. | Use at least two addresses and two eligible nodes, save again, and allow placement to reconcile. |
| S3 clients cannot connect after reassignment. | Progress result, DNS, port and protocol, TLS name, and routing to every group address. | Correct DNS, network, or TLS configuration. If the job failed, automatic rollback may have restored the previous group. |
| The IP Group cannot be deleted. | The Members column and attached SMB, NFS, S3, or iSCSI resources. | Remove or reassign every member before deleting the group. |
| Client access is intermittent. | Duplicate IP address, asymmetric routing, inconsistent VLAN or MTU settings, and unreachable addresses in DNS. | Correct the network design and test every published address from the client segment. |
Delete an IP Group
Deleting a group removes its service addresses from the cluster. Clients lose access if a service or DNS record still depends on those addresses.
- Identify every member in the overview.
- Remove the attached services or assign them to another IP Group.
- Confirm that no DNS record or client still depends on the addresses.
- Open the group, select Delete Group, and confirm.
- Verify that the group is absent, its addresses no longer respond, and the remaining services are healthy.
- Update DNS, IPAM, and operational records.
Commissioning checklist
- Addresses reserved and excluded from DHCP
- VLAN, subnet, MTU, routing, and firewall validated on every eligible node
- Gateway order approved
- Placement mode matches the service design
- DNS records created and tested
- S3 certificate matches the DNS name
- iSCSI multipath configured where applicable
- Service membership visible in the overview
- Normal endpoint test passed
- Controlled failover and recovery test passed
- Monitoring and operational documentation updated