
VM Balancing – Administrator Guide
The screenshots illustrate the English user interface. Names and addresses shown are examples; use the values defined for your environment.
About this guide
This guide explains how to operate VM Balancing from the eEVOS web interface. It is intended for system and virtualization administrators. It assumes that an eEVOS cluster and shared virtual-machine storage are already configured and healthy.
Before you begin
- Verify that all expected cluster nodes are online and show current load information.
- Verify shared storage and the VM migration network before enabling automatic migrations.
- Confirm that cluster time is synchronized, especially when using schedules or blackout windows.
- Ensure that backup and recovery procedures are current and tested.
- Start with Recommendations only unless an existing balancing policy has already been validated.
Understand the interface
| Tab | Use |
|---|---|
| Cluster | Review node load and calculate a destination recommendation for a running VM. |
| Automation | Configure monitoring, automation level, schedules, thresholds, and safeguards. |
| Groups & Rules | Define VM groups, host groups, affinity, separation, and host placement rules. |
| Maintenance | Preview and perform migration of workloads from a node before maintenance. |
| History | Review balancing and migration operations. |
| Trends | Review cluster imbalance over time and balancing effectiveness. |
| Audit | Review administrator and policy changes. |
| Recommendations | Approve, postpone, dismiss, or execute generated recommendations. |
| Compliance | Check running VMs against required placement rules. |
| Capacity | Simulate node loss or added capacity and review energy recommendations. |
| Alerts | Review and acknowledge balancing-related warnings and critical conditions. |
Review cluster load
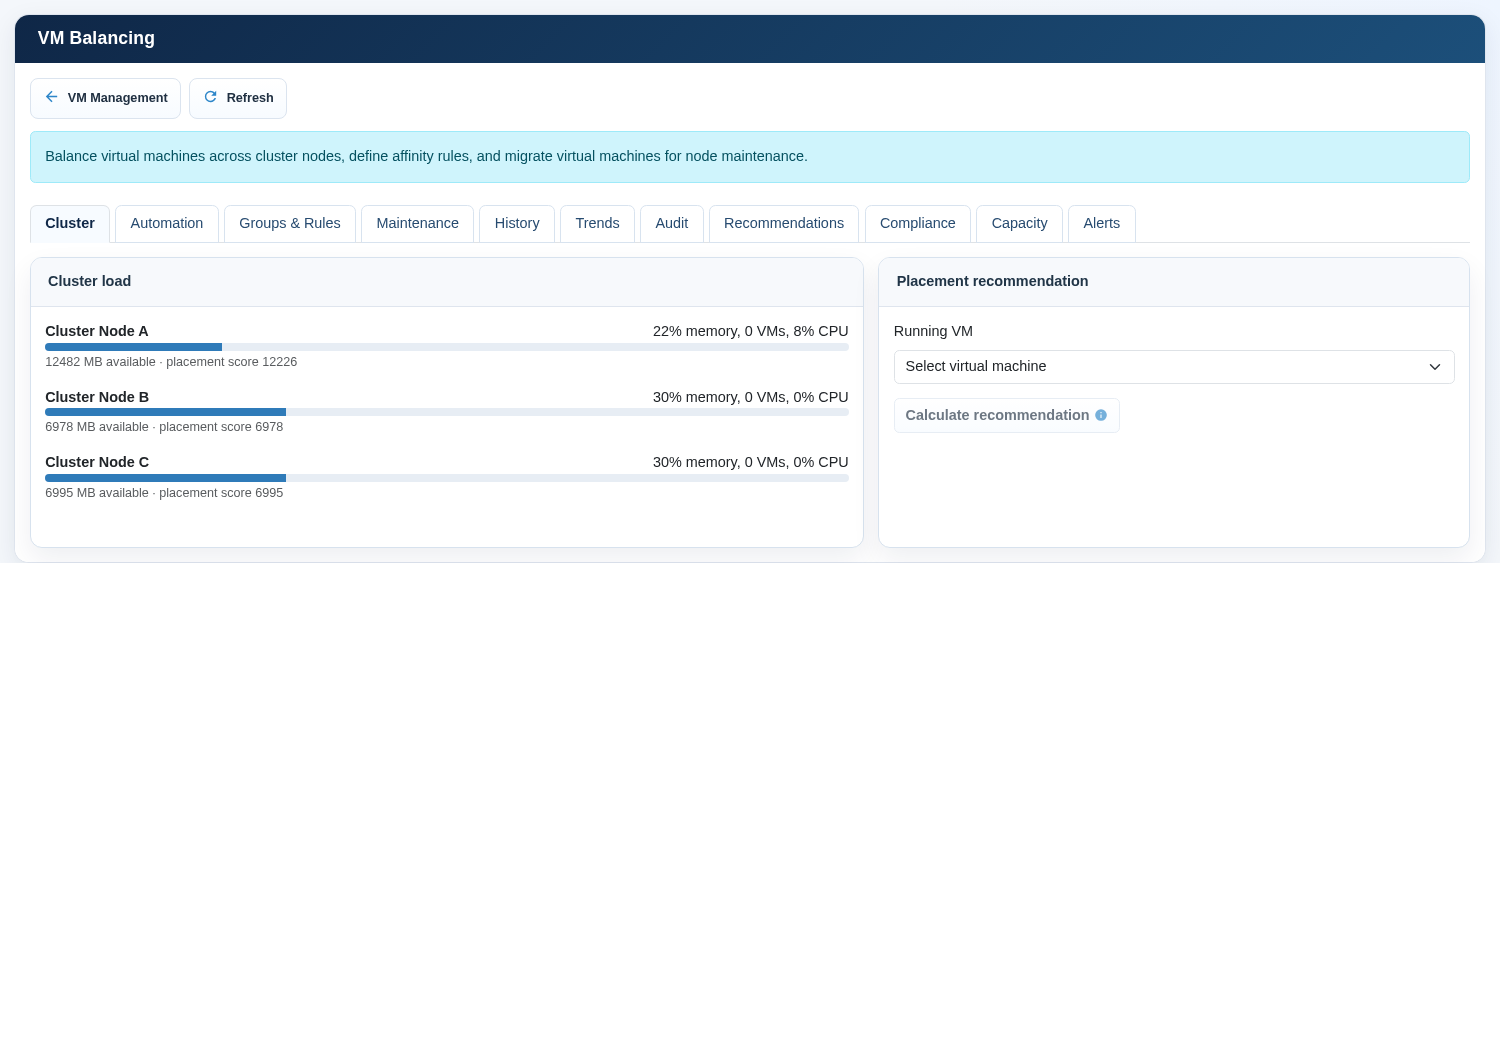
- Open the Cluster tab.
- Wait until all nodes finish loading. A progress indication is shown during collection.
- Confirm that the expected nodes are listed.
- Review memory use, available memory, running VM count, CPU load, and placement score.
- Investigate missing nodes or implausible values before calculating or executing a migration.
Placement score is a comparative indicator used by the placement decision. A higher score does not by itself authorize a move; policy constraints, storage availability, resource requirements, and required rules also apply.
Calculate a VM recommendation
- In Placement recommendation, select a running virtual machine.
- Select Calculate recommendation. The button remains disabled until a VM is selected.
- Wait while the interface evaluates nodes, capacity, storage health, and placement rules.
- Review the recommended destination and estimated improvement.
- If no destination is eligible, review capacity, maintenance state, tags, affinity rules, and storage health.
- Execute the migration only after confirming that the proposed destination and operational timing are acceptable.
Configure the monitoring service
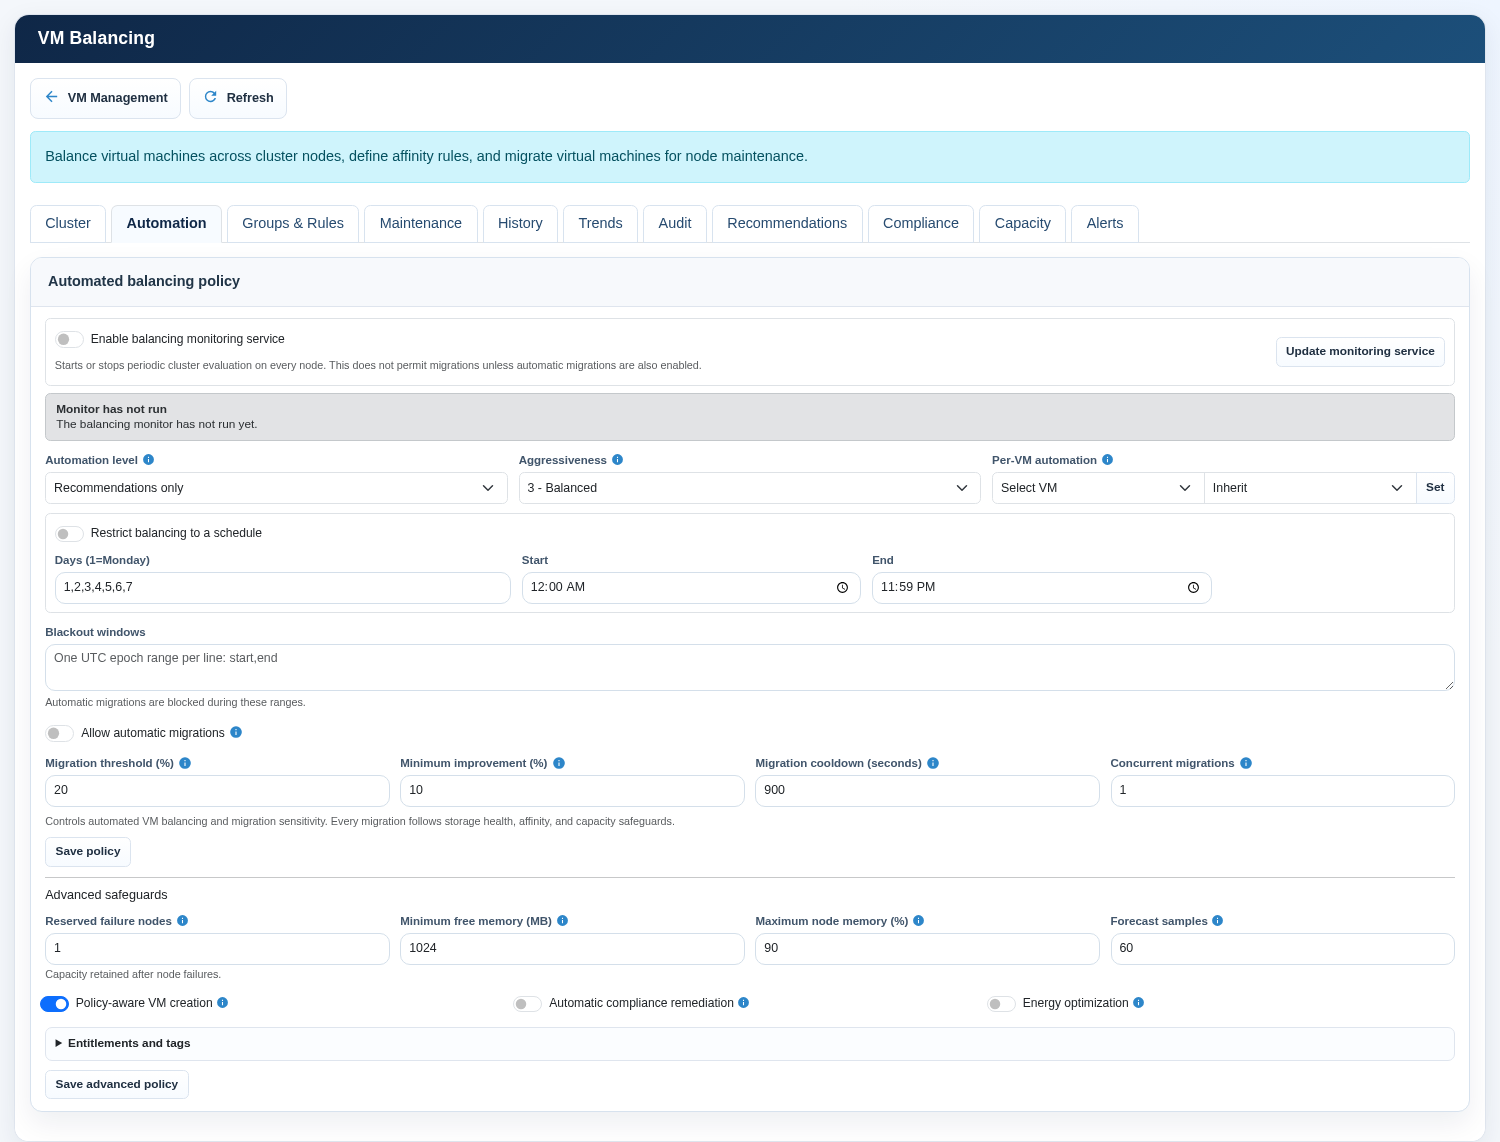
Enable balancing monitoring service controls whether periodic cluster evaluation runs on the nodes. Update monitoring service applies the switch state across the cluster. This control does not grant permission to migrate VMs. Automatic migration permission is configured separately.
- Open Automation.
- Set Enable balancing monitoring service to the required state.
- Select Update monitoring service.
- Confirm that the monitor status panel changes from not run or disabled to an active evaluation state.
- If it remains disabled, refresh and verify service status and cluster communication.
Choose an automation level
| Setting | Meaning | Recommendation |
|---|---|---|
| Recommendations only | Creates recommendations without automatic VM movement. | Use for initial deployment and tightly controlled workloads. |
| Partially automated | Allows selected policy-driven or approved operations. | Use during staged adoption. |
| Fully automated | Allows eligible moves when every configured condition passes. | Use only after migration and safeguard testing. |
Aggressiveness controls how readily the system recommends a migration. Conservative settings require a clearer benefit and reduce movement. Aggressive settings react to smaller load differences and can increase migration frequency. Begin with 3 - Balanced and adjust using observed history and trends.
Per-VM automation overrides the cluster automation level for one VM. Select the VM, choose the override, and select Set. Inherit removes the exception and uses the cluster setting.
Configure migration timing and sensitivity
| Option | Operational meaning |
|---|---|
| Restrict balancing to a schedule | Permits automated balancing only on selected days and between the configured start and end times. |
| Blackout windows | Blocks automatic migration for explicit UTC epoch ranges. |
| Migration threshold | Minimum cluster load difference before balancing is considered. |
| Minimum improvement | Minimum estimated benefit required for a proposed migration. |
| Migration cooldown | Minimum waiting period before another automatic migration. |
| Concurrent migrations | Maximum balancing migrations allowed at one time. |
Configure advanced safeguards
| Option | Purpose |
|---|---|
| Reserved failure nodes | Keeps enough cluster capacity available to tolerate the specified number of node failures. |
| Minimum free memory | Rejects a destination if too little memory would remain after placement. |
| Maximum node memory | Rejects projected placement above the configured node memory percentage. |
| Forecast samples | Controls how many recent monitoring samples contribute to capacity forecasting. |
| Policy-aware VM creation | Applies balancing and admission policy when selecting a node for a new VM. |
| Automatic compliance remediation | Allows migration of a VM that violates a required rule, subject to safeguards. |
| Energy optimization | May recommend moving VMs from an eligible low-load node into standby; it does not power off hardware. |
Entitlements and tags provide workload-specific placement information. Resource entitlement defines relative priority, shares, reservation, and limit. Node attributes describe site, rack, and capabilities. Required VM tags restrict a VM to nodes providing every listed tag.
Create groups and placement rules
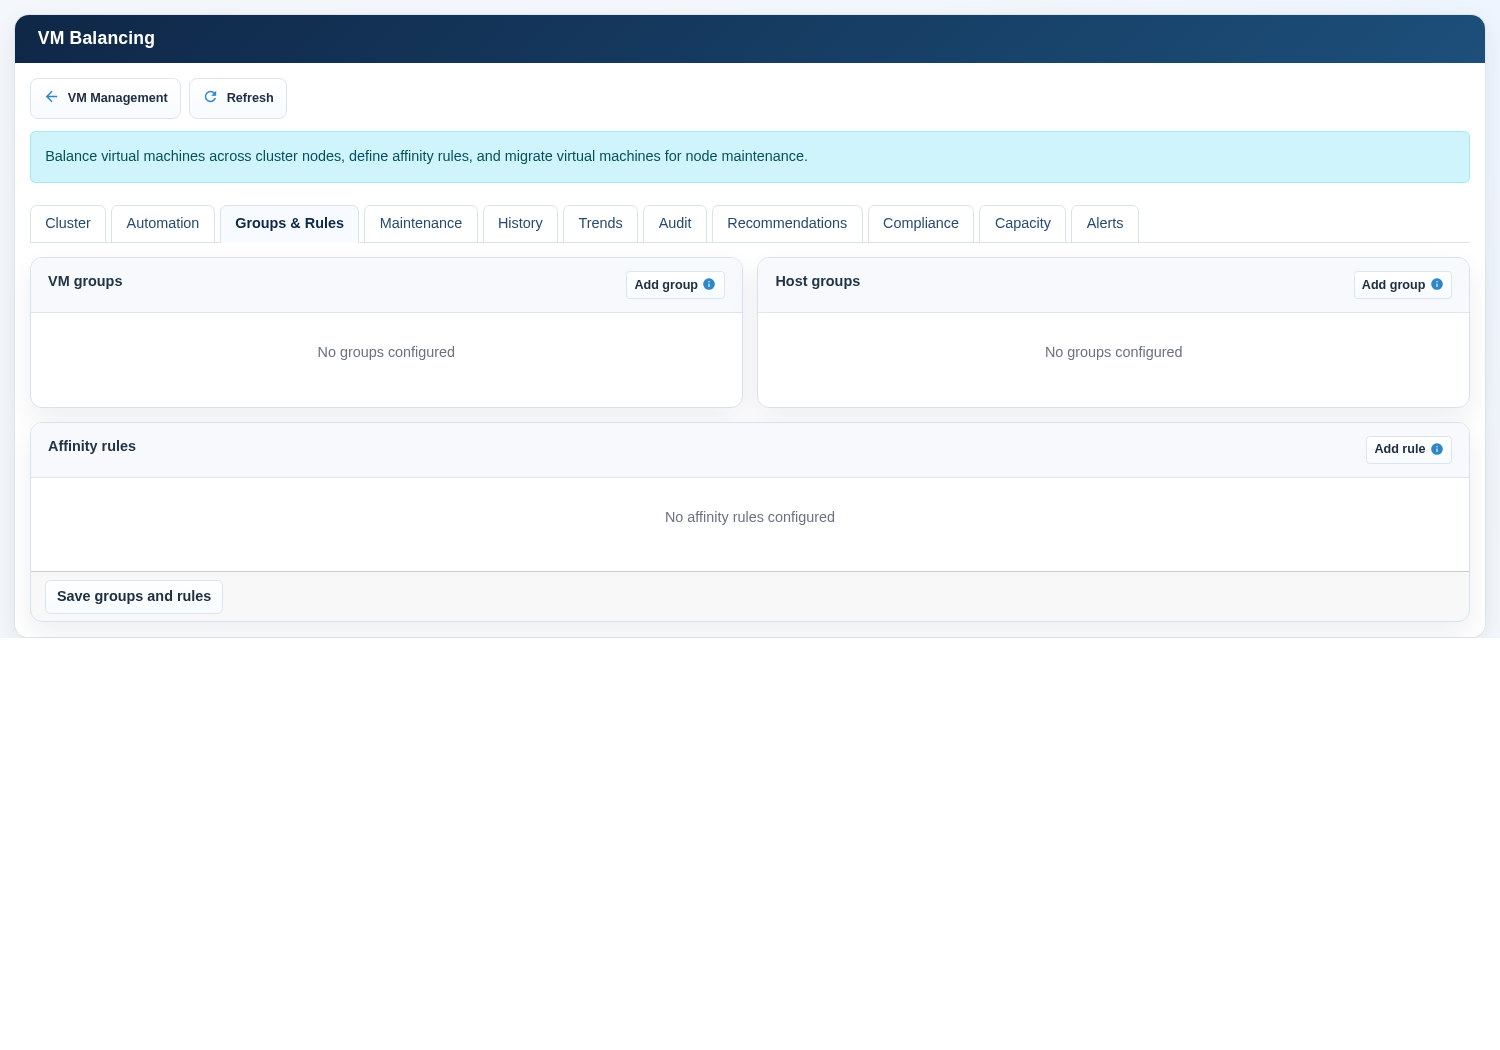
- Open Groups & Rules.
- Create a VM group and enter its member VM names.
- Create a host group when placement must be limited to a defined set of nodes.
- Add an affinity rule and select its type and strength.
- Use Keep VMs together for workloads that should share placement.
- Use Separate VMs for redundant services that should not share a node.
- Use VM to host group to constrain workloads to approved nodes.
- Choose Required only for constraints that must never be violated; choose Preferred when the system may deviate if necessary.
- Select Save groups and rules, then run a compliance scan.
Perform a maintenance migration
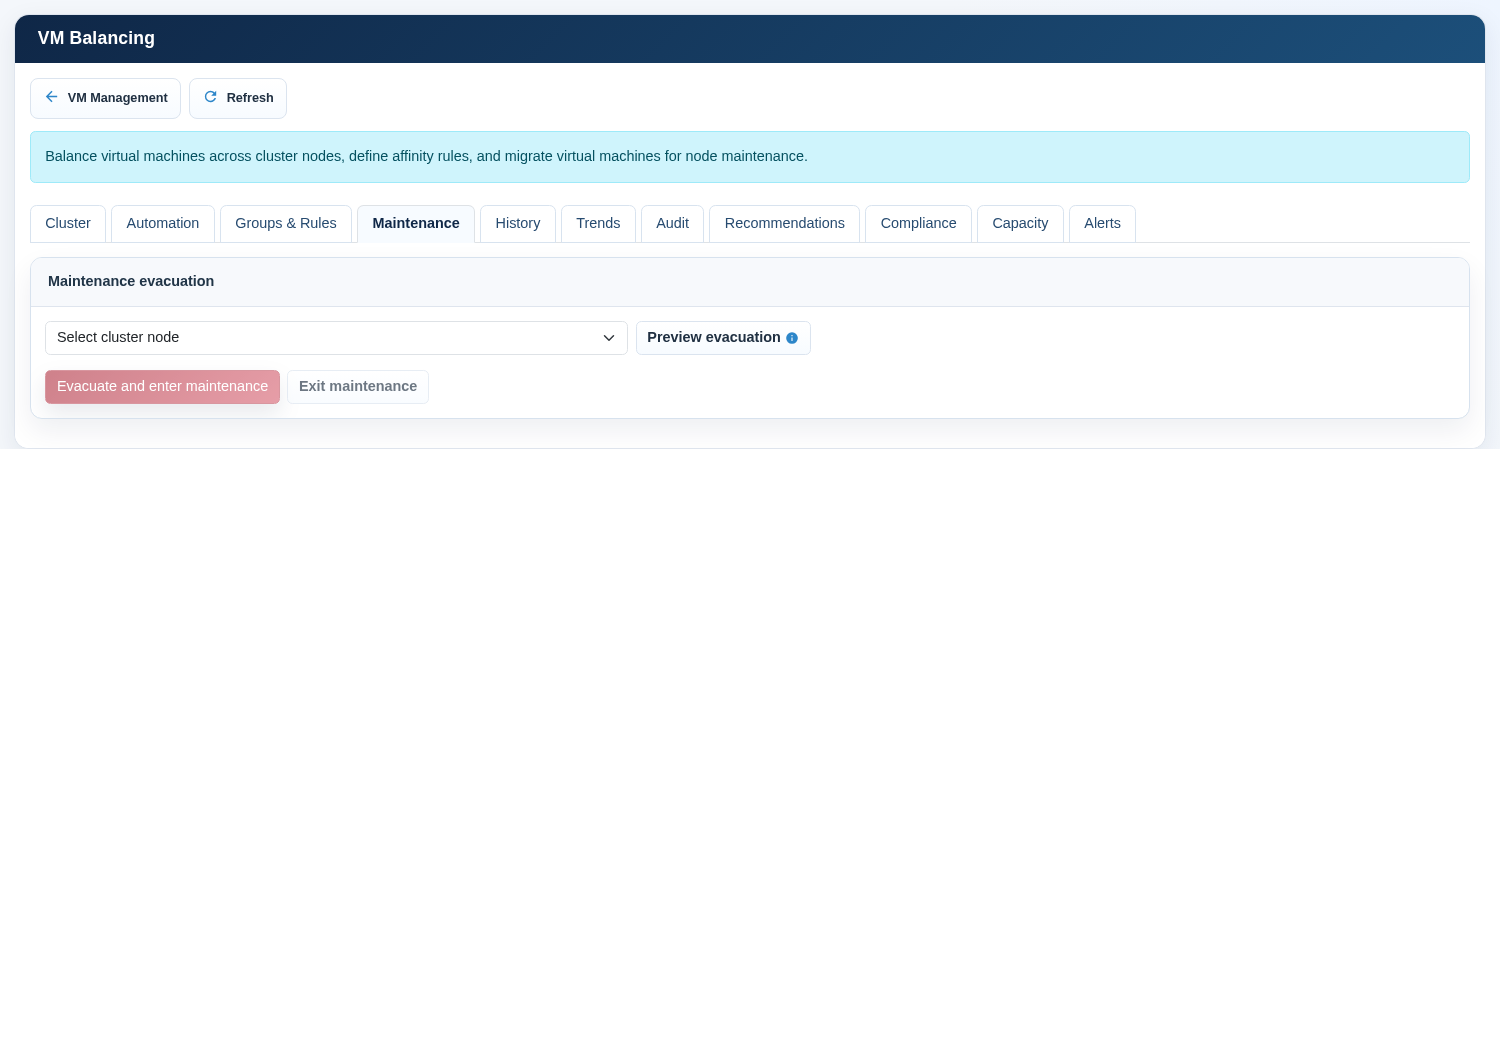
- Open Maintenance and select the node to be serviced.
- Select Preview evacuation. In this interface, evacuation means migrating eligible VMs away from the selected node; it does not delete VMs.
- Review every proposed VM destination and resolve any VM without an eligible destination.
- Confirm that remaining cluster capacity can sustain the maintenance period.
- Select Evacuate and enter maintenance and enter the displayed confirmation token.
- Monitor progress in History and verify VM state in VM Management.
- Perform the planned node work only after all required workloads have moved.
- When the node is healthy and joined to the cluster, select Exit maintenance.
Review recommendations
- Approve when the destination, timing, and expected improvement are acceptable.
- Postpone when the recommendation is valid but the current time is unsuitable.
- Dismiss when the recommendation is no longer appropriate or policy should be adjusted.
- Execute migration only after approval and operational review.
Compliance, capacity, and alerts
Run compliance after changing rules, tags, node attributes, or workload placement. Resolve required-rule violations by correcting the policy, restoring an eligible node, adding capacity, or performing a controlled migration.
Capacity simulation does not change infrastructure. Use node-loss simulation to verify failure tolerance and added-node simulation to estimate the effect of additional capacity. Simulation is planning evidence, not a substitute for a controlled failover test.
Alerts identify balancing conditions that need attention. Read severity, code, status, and message. Investigate the underlying condition before acknowledging an alert. Acknowledgement records that the alert was reviewed; it does not correct the condition.
Routine operating procedure
| Frequency | Checks |
|---|---|
| Daily | Node availability, monitor status, open critical alerts, failed or running migrations. |
| Weekly | Load trend, repeated recommendations, compliance violations, capacity headroom. |
| Monthly | Threshold effectiveness, per-VM overrides, required rules, schedules, blackout windows, reserved failure capacity. |
| Before maintenance | Storage and network health, migration preview, destination capacity, backup status, active operations. |
| After maintenance | Node online state, VM distribution, compliance scan, alerts, migration history. |
Troubleshooting
| Symptom | Likely cause | Administrator action |
|---|---|---|
| Expected node is missing | Node offline, cluster communication issue, or status collection incomplete. | Refresh, check cluster status and node connectivity, and do not migrate until membership is understood. |
| No eligible destination | Capacity, storage, maintenance state, required tags, or affinity constraints exclude all nodes. | Review safeguards, node attributes, rules, and shared storage health. |
| Monitor says disabled | Monitoring service is off or policy evaluation is not active. | Enable the switch, select Update monitoring service, refresh, and verify status. |
| Recommendations appear but no automatic migration occurs | Recommendations-only mode, automatic migrations disabled, schedule/blackout, cooldown, or per-VM override. | Review all automation gates; do not weaken safeguards without identifying the blocking condition. |
| Migration fails | Destination, network, storage, VM state, or concurrency issue. | Review alert and history details, verify VM state, resolve infrastructure health, then recalculate. |
| Compliance violation persists | Required rules conflict or no eligible placement exists. | Simplify conflicting rules, restore capacity, or add an eligible tagged node. |
| High migration frequency | Aggressiveness too high, threshold too low, cooldown too short, or unstable workload demand. | Use Trends and History, then increase threshold/cooldown or reduce aggressiveness. |
Change and rollback guidance
- Record the current policy and per-VM overrides before a material change.
- Change one policy area at a time and save it.
- Run compliance and calculate representative recommendations.
- Observe history, trends, and alerts through a normal workload period.
- If behavior is unsuitable, disable automatic migrations first; monitoring may remain enabled.
- Restore the previous thresholds, schedule, rules, and overrides, then validate again.
Administrator checklist
- All expected nodes are online and reporting plausible load.
- Shared VM storage and migration networks are healthy.
- Monitoring state and automatic migration permission match the intended policy.
- Automation level and aggressiveness are appropriate for the workload risk.
- Schedules, blackout windows, cooldown, and concurrency are documented.
- Failure capacity and memory safeguards match the availability objective.
- Required groups, rules, tags, and per-VM exceptions are current.
- Recommendations, compliance, history, trends, audit, capacity, and alerts are reviewed regularly.