
VM Templates
The screenshots illustrate the English user interface. Names and addresses shown are examples; use the values defined for your environment.
About this guide
This guide explains how to create, manage, deploy, convert, and retire VM Templates in the eEVOS6 web interface. The examples use generic Windows Server 2025 names and do not perform a real deployment.
Before you begin
- Verify that VM storage is mounted, healthy, and has enough free capacity for the template and planned deployments.
- In a cluster, confirm that the relevant datastore, networks, and nodes are visible and healthy.
- Use a powered-off source VM. Do not attempt template conversion while the guest is running or shutting down.
- Complete guest preparation: patches, approved tools, cleanup, identity generalization where required, and removal of secrets.
- Confirm licensing and activation requirements for Windows Server and installed applications.
- Take or verify an appropriate backup before converting a valuable source VM.
Understand the template library
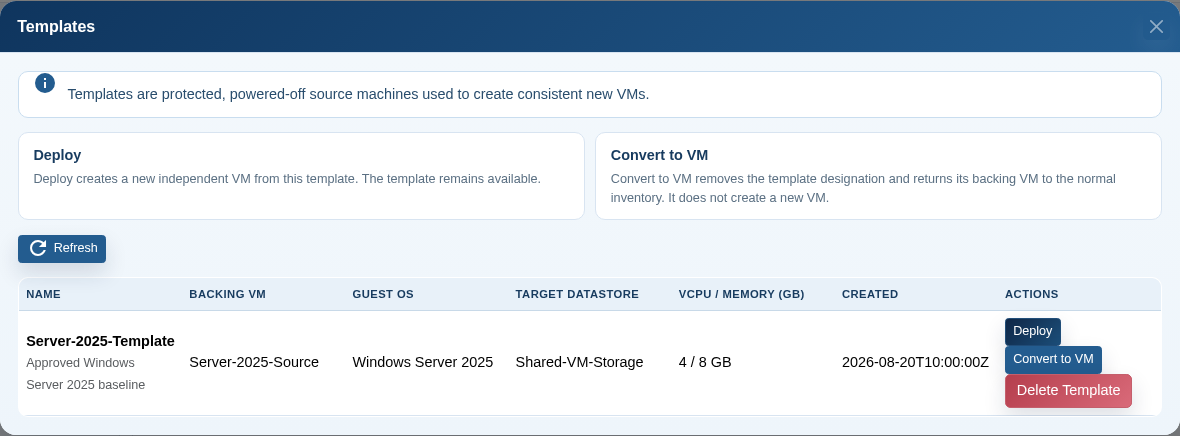
| Column or action | Use |
|---|---|
| Name and description | Identify the approved baseline and its intended workload. |
| Backing VM | Shows the protected VM that supplies the template content. |
| Guest OS | Identifies the guest family recorded for the source. |
| Target datastore | Shows the source/default datastore associated with the template. |
| vCPU / Memory (GB) | Displays the template resource defaults. |
| Deploy | Starts the wizard to create a new independent VM. |
| Convert to VM | Returns the backing VM to normal inventory and removes the template. |
| Delete Template | Permanently deletes the template backing VM after confirmation. |
| Refresh | Reloads the current template library and revision. |
Choose how to create a template
| Action | Choose it when | Effect on source VM |
|---|---|---|
| Convert to Template | The selected powered-off VM should become the template itself. | It leaves normal inventory and becomes a protected template. |
| Clone as Template | The original powered-off VM must remain available as a normal VM. | The original remains unchanged; a separate template copy is created. |
Convert a powered-off VM to a template
- Open VM Management and verify that the intended source VM is powered off.
- Open the VM action menu and select Convert to Template.
- Review the explanation that the VM will leave normal inventory and cannot be started while designated as a template.
- Enter a template name. Spaces are automatically replaced with hyphens; use a concise name such as Server-2025-Template.
- Enter a description that identifies the operating-system baseline, purpose, or release.
- Select the confirmation action and wait for completion.
- Open Administration → Templates and verify the name, backing VM, datastore, vCPU, and memory.
Clone a powered-off VM as a template
- Open VM Management and verify that the source VM is powered off.
- Open the VM action menu and select Clone as Template.
- Review the explanation that the original VM will remain unchanged.
- Enter a unique template name and an operational description.
- Start the clone operation and keep the progress window open until it finishes.
- Verify that the original VM remains in normal inventory and the new template appears in Templates.
Start creating a VM
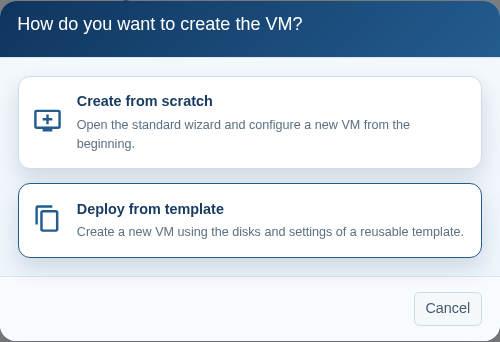
When at least one template exists, Create New VM offers two paths. Create a new VM opens the standard wizard; Create from template opens the template deployment workflow.
Deploy from a template — identity
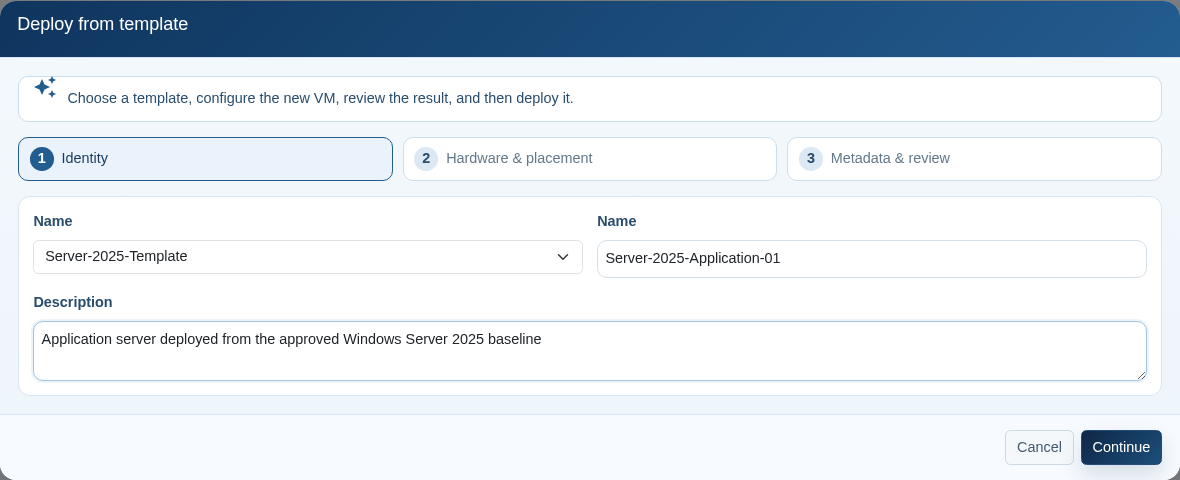
- Select Create New VM and then Create from template, or select Deploy beside a template.
- Select the required template.
- Enter a unique VM name using letters, numbers, periods, underscores, or hyphens. Spaces are converted to hyphens.
- Enter a description that states the new VM purpose.
- Select Continue.
Deploy from a template — hardware and placement
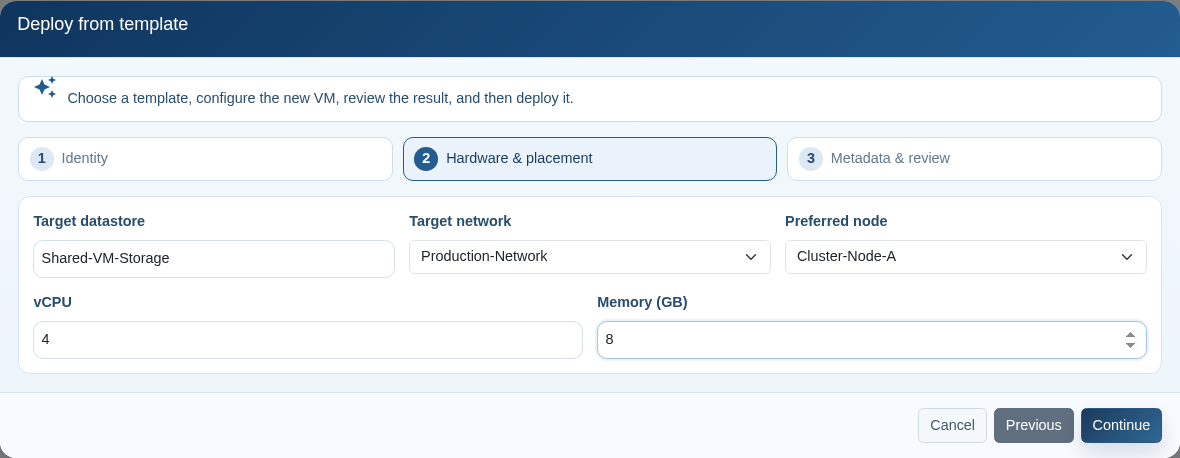
- Confirm or change the target datastore.
- Keep the template network or choose an available target network from the list.
- Leave preferred node on automatic placement or select an eligible cluster node.
- Set the required vCPU count.
- Set memory in GB.
- Select Continue. Use Previous if a value must be corrected.
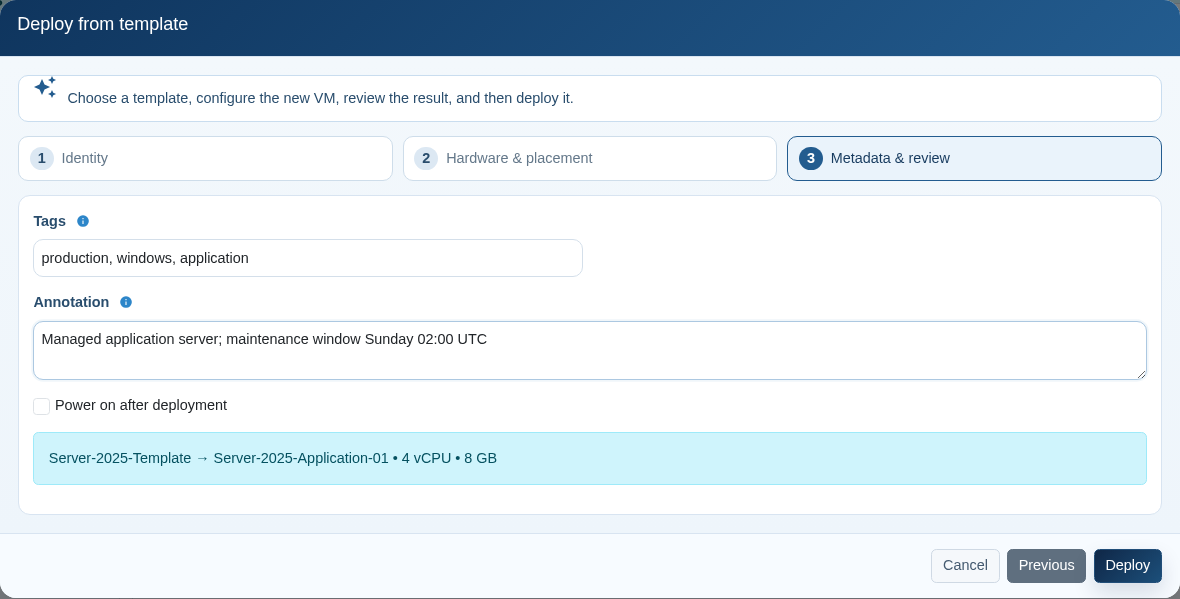
Deploy from a template — metadata and review
Post-deployment validation
- Confirm that the deployed VM is independent and has the expected virtual disks and resource values.
- Verify unique Windows identity, hostname, network configuration, and activation status.
- Check time synchronization, monitoring, endpoint protection, backup policy, and update status.
- Verify application services before placing the VM into production.
- Confirm that the original template remains in the Templates library.
Convert a template back to a VM
Convert to VM removes the template designation and returns its backing VM to normal VM inventory. It does not deploy a copy and the template will no longer be available for future deployments.
- Open Administration → Templates.
- Locate the template and select Convert to VM.
- Read the confirmation carefully and continue only when the template should be retired.
- Refresh VM Management and verify that the backing VM is visible in normal inventory.
- Review its configuration before starting it.
Delete a template
Delete Template permanently deletes the backing VM associated with the template. The confirmation modal asks whether the administrator is 100% sure and provides a red deletion button. No confirmation text needs to be typed.
- Confirm that no future deployment depends on the template and that retention requirements are satisfied.
- Verify that a backup or replacement template exists when required.
- Select Delete Template.
- Review the template name and irreversible-action warning.
- Select the red confirmation button to delete, or Cancel to leave the template unchanged.
Maintain template quality
| Frequency | Recommended checks |
|---|---|
| Before release | Guest cleanup, identity preparation, patch level, security agents, licensing, shutdown state, test deployment. |
| Monthly or by policy | Template age, operating-system updates, free storage, description accuracy, deployment success. |
| After major updates | Create or validate a new release and retain the previous release until acceptance is complete. |
| Before retirement | Dependency review, replacement availability, backup/retention requirement, documented approval. |
Troubleshooting
| Symptom | Likely cause | Action |
|---|---|---|
| Template action is unavailable | The selected source VM is running, shutting down, or otherwise ineligible. | Power off the VM completely, refresh inventory, and try again. |
| Template list does not refresh | Backend response, helper execution, registry, or shared-system path issue. | Refresh once, check VM management service status and logs, then validate the template helper output. |
| Template registry changed | Another session changed the library revision. | Close or refresh Templates and repeat the action using the current library. |
| No network or preferred node is listed | No eligible value was returned by current VM or cluster configuration. | Verify virtual networks, cluster membership, and node availability. |
| Deployment fails | Name collision, capacity, storage visibility, network mapping, source state, or backend operation failed. | Read the displayed error, verify infrastructure state, correct the cause, and retry with a unique VM name. |
| New VM starts with duplicate identity | Guest preparation or first-boot customization was incomplete. | Disconnect or stop the VM, correct the template preparation process, and do not place the duplicate into production. |
| Template is missing on another node | Shared storage or cluster synchronization is unavailable or inconsistent. | Check datastore visibility, cluster synchronization, mounts, and service health before changing the template. |
Administrator checklist
- Source VM is powered off and prepared for cloning.
- Template name and description identify purpose and release.
- No reusable secrets or environment-specific identity remain in the source.
- Storage, network, cluster node, CPU, and memory selections are valid.
- Licensing and activation procedures are understood.
- A test deployment has passed guest, network, monitoring, backup, and application checks.
- Template review and retirement dates are recorded.
- Deletion is used only after dependency, backup, and retention review.